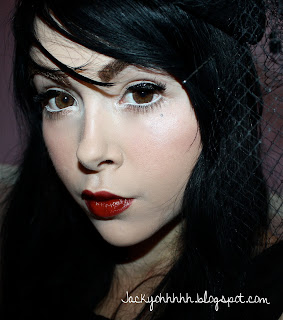
So today I have a vintage makeup tutorial for you guys. This is also an everyday makeup tutorial because I wear vintage makeup everyday. The Geo Big Grang Grang Brown lenses I am wearing are sponsored by the fantastic Uniqso :)
I have explained my foundation and brow routine a couple times very recently so I am just going to link out those routines and start this tutorial with those steps finished.You can do those two steps however you do them normally. I find vintage brows a bit more groomed so I suggest filling them in with powder or a pencil and possibly using a brow mascara to make them stay absolutely perfect.
Blush and highlighting:
I have always been obsessed with blush but a new makeup product for me is highlighters. I absolutely love these makeup products. They are quite subtle but they add a nice dimensionality to your face.
1.I first apply my favorite powder matte blush to the apples of my cheeks. Revlon Matte Powder Blush in Perfectly Peach
2.After that I apply a shimmery blush my cheekbones. I feel like this adds a bit of dimension to them and a sort of highlight with the shimmer.The Blush I am applying is the blush from the e.l.f Studio Contour Blush and Bronzing powder in St Lucia and I apply this with my e.l.f Studio Powder Brush
3.After blush I get to do one of my new favorite makeup steps!Highlightttinngggg. I also want to figure out how to contour but I haven't quite gotten the hang of that yet. Plus, I am incredibly pale so it is hard to find a bronzer that I can wear without looking like a goof. ANYWAY, I apply my new Benefit Highlighter in High Beam (review coming soon) to my cheekbones and brow bone.
This step makes the light hit your face in a very nice way.
And now your cheeks are finished!
Eyes:
So since I use individual lashes I don't really need to apply lashes for this look however Uniqso does have a large selection of lashes and you can use a number of their options.I would recommend a more natural lash style for this look.
Etude House Wonder Volume lashes2.Etude House Wonder Volume lashes
1. Apply an eyelid primer to your lids. This evens out your skin tone there and keeps the liner from smudging up your eye at the end of the day. I use my e.l.f Essentials Eyelid Primer in Sheer
2. Then I apply a liquid liner. I start off by making a diagonal line from the middle of my eyelid outward. I do this with my NYX Studio Liquid Liner in Extreme Black (review coming soon)
3.Fill in the outline with more liquid liner
4.Bring the outline a bit closer to your inner eye.
5. To add a little bit of subtle color to your lower lash line, apply a nice champagney eyeshadow there. I applied my Milani Shadow Eyez in Champagne Toast
6. Then I apply a white shadow outline to my inner eye. I do this with my Maybelline 24hr Color Tattoo Eyeshadow in Too Cool
7. I then line my waterline with a white eyeliner. This makes your eyes appear bigger and more awake. I do this with my NYX Retractable Eyeliner in White (review coming soon)
8. I then just apply mascara to my lower lashes. To be honest guys, I don't even know what the name of the mascara I use is. I got it as a deluxe sample from Sephora.
9. I added a beauty mark below my eye :) You don't need to but I thought it would be cute. I just did this with my black liquid liner.
And now!Your eyes are finished!
Lips:
1. I keep buying red lipsticks but my all time favorite red lip product is the Tony Moly Red Apple Lip Tint
I just apply this to my upper and lower lips.
2. I spread the tint out with my Revlon Just Bitten Lipstain in Gothic. I just follow the shapes of my lips when I do this.
3. My third step is applying a tiny bit of MAC Film Noir Lipstick to darken the lips up a bit.
4. The final stepppp is applying a balm so your lips don't become dry. I apply my Black Widow Lip Balm in Ursula
Tadaaaa!You're done!
Onto the circle lens review!:
Geo Big Grang Grang Brown:
Of course these came in the cute little Uniqso teddy box!They also added a qtip in case you're having trouble getting your lenses out of the vials. Thats pretty nice!
Packed all safe and bubble wrapped!
Flash
No Flash
Diameter:
15.00mm
Water Content: 38%
Base Curve: 8.70
Replacement Period: within 12 months
Water Content: 38%
Base Curve: 8.70
Replacement Period: within 12 months
Design: 10/10 The design of these makes your eyes look jewel like. They also blend perfectly with my natural eye color. I love the brown limbal ring and the halo effect is great. They are very natural but make your eyes look special and pretty.
Enlargement: 9/10 Because the limbal ring is brown and these lenses are fairly light they don't look as big as they could. However, I do love the light limbal ring and I think the enlargement is just perfect.
Comfort: 6/10 ehhh. The right lens feels fine but the left lens feels sort of crappy. It feels like there is something poking my eye slightly. These are wearable for a couple hours but they definitely feel annoying during those couple of hours.
Overall: 8/10 I love the design and the enlargement of these. They blend so beautifully with my natural eye color.However, since the one circle lens is quite uncomfortable and I need contacts to see I don't find myself reaching for these too often :(
WANT THESE? Get em' HERE !
Hope you guys enjoyed this review and my tutorial! :) Have a good day!


No comments:
Post a Comment